|
This helpfile
has been contributed by Billy Constantine (SysAdmin at University of
Adelaide, Mech Eng). This file describes how to get the Unix version
of OMA-X running on Microsoft Windows, using the Cygwin compatibility
layer.
The system used was an HP Compaq D530 SFF, Pentium 4 2.7GHz with
512MB RAM. Pre-installed software consisted of Microsoft Windows 2000 SP4,
Internet Explorer 6.0 SP1, all relevant hotfixes from MS03-041 to MS04-028
(most recent at install time) and Symantec Antivirus 8.1.
The process consists of three main steps:
- - installation
of Cygwin
-
- compilation and installation of XForms
-
- compilation of OMA-X
1) Installation of Cygwin
- Download the current Cygwin installer from http://www.cygwin.com/
- setup.exe v2.427
- Run the installer, and select the following packages to install
(versions I used are parenthesised):
ash
(20040127-1)
|
base-files
(3.0-3)
|
base-passwd
(2.0-1)
|
bash
(2.05b-16)
|
binutils
(20040725-2)
|
bzip2
(1.0.2-6)
|
cygwin
(1.5.11-1)
|
diffutils
(2.8.7-1)
|
editrights
(1.01-1)
|
expat
(1.95.7-1)
|
fileutils
(4.1-2)
|
findutils
(4.1.7-4)
|
fontconfig
(2.2.2-1)
|
freetype2
(2.1.5-1)
|
gawk
(3.1.4-3)
|
gcc
(3.3.3-3)
|
gcc-core
(3.3.3-3)
|
gcc-g++
(3.3.3-3)
|
gcc-mingw-core
(20040810-1)
|
gcc-mingw-g++
(20040810-1)
|
gdbm
(1.8.3-7)
|
gettext
(0.14.1-1)
|
grep
(2.5-1)
|
groff
(1.18.1-2)
|
gzip
(1.3.5-1)
|
jpeg
(6b-11)
|
less
(381-1)
|
libbz2_1
(1.0.2-6)
|
libcharset1
(1.9.2-1)
|
libfontconfig-devel
(2.2.2-1)
|
libfontconfig1
(2.2.2-1)
|
libfreetype2-devel
(2.1.5-1)
|
libfreetype26
(2.1.5-1)
|
libgdbm
(1.8.0-5)
|
libgdbm-devel
(1.8.3-7)
|
libgdbm3
(1.8.3-3)
|
libgdbm4
(1.8.3-7)
|
libgettextpo0
(0.14.1-1)
|
libiconv
(1.9.2-1)
|
libiconv2
(1.9.2-1)
|
libintl
(0.10.38-3)
|
libintl1
(0.10.40-1)
|
libintl2
(0.12.1-3)
|
libintl3
(0.14.1-1)
|
libjpeg62
(6b-11)
|
libjpeg6b
(6b-8)
|
libncurses5
(5.2-1)
|
libncurses6
(5.2-8)
|
libncurses7
(5.3-4)
|
libpcre
(4.1-1)
|
libpcre0
(4.5-1)
|
libreadline4
(4.1-2)
|
libreadline5
(4.3-5)
|
libXft
(2.1.6-1)
|
libXft-devel
(2.1.6-1)
|
libXft1
(1.0.0-1)
|
libXft2
(2.1.6-1)
|
login
(1.9-7)
|
make
(3.80-1)
|
man
(1.5o-1)
|
mingw-runtime
(3.5-1)
|
mktemp
(1.5-3)
|
ncurses
(5.3-4)
|
pcre
(4.5-1)
|
pcre-doc
(4.5-1)
|
readline
(4.3-5)
|
sed
(4.1.2-1)
|
sh-utils
(2.0.15-4)
|
tar
(1.13.25-5)
|
termcap
(20021106-2)
|
terminfo
(5.3_20030726-1)
|
texinfo
(4.2-4)
|
textutils
(2.0.21-1)
|
w32api
(3.1-1)
|
which
(1.5-2)
|
X-startup-scripts
(1.0.9-1)
|
XFree86-lib-compat
(4.3.0-2)
|
xorg-x11-base
(6.8.1.0-1)
|
xorg-x11-bin
(6.8.1.0-1)
|
xorg-x11-bin-dlls
(6.8.1.0-1)
|
xorg-x11-bin-lndir
(6.8.1.0-1)
|
xorg-x11-devel
(6.8.1.0-1)
|
xorg-x11-etc
(6.8.1.0-1)
|
xorg-x11-fenc
(6.8.1.0-2)
|
xorg-x11-fnts
(6.8.1.0-2)
|
xorg-x11-libs-data
(6.8.1.0-1)
|
xorg-x11-xwin
(6.8.1.0-3)
|
xterm
(185-4)
|
zlib
(1.2.1-2)
|
_update-info-dir
(00228-1)
|
This represents a minimal Cygwin install, plus C compiler, JPEG
development libraries, X development libraries and an X server.
- Once installed,
run the batch file <CYGWIN>\usr\X11R6\bin\startxwin.bat;
this should give you a running X server and an xterm.
2) Compilation and installation of
XForms
- Download the
XForms source package from
http://savannah.nongnu.org/download/xforms/
-xforms-1.0.90.tar.gz
- In the Cygwin xterm, unpack the xforms archive, cd to the directory
that was created, and execute
./configure --prefix=/usr/X11R6 --with-extra-inc=/usr/X11R6/include
make
make install
This will
install a GL-aware XForms package under /usr/X11R6
(instead of /usr/local
- this will simplify the OMA
build procedure).
3) Compilation of OMA
- Download the "OMA for Unix
X-windows Bundle" from
http://oma-x.org/download.htm
xoma.tgz
v1.0b
- In the Cygwin xterm, unpack the xoma archive and cd to the directory
that was
created.
- Edit the Makefile
so that the linker will search /usr/X11R6/bin
in addition
to /usr/X11R6/lib, ie:
gcc -L/usr/X11R6/bin -L$(LIBX) -o $(EXEC1) $(OBJECTS1)
-lX11 -lm -lforms
- Edit the file uxdisplay.c and comment out line 1260:
*(cp + strlen(cp)-1) = 0; // get
rid of echoed character
which causes a fatal
compile error when left in (assignment of read-only
location)
- Execute:
make oma
./oma.exe
This will compile and run the OMA binary that was just built. To
check that it
works,
hit a key (eg Enter or Space) in the "OMA Commands" window, and once
the "OMA>" prompt has appeared, do:
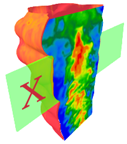
get test
displa
This should open a window displaying
the test data, found in the build
directory.
BUGS
- The OMA Commands window
isn't active until a key has been pressed.
- The location of cursor within the OMA Commands window is important.
Hitting
keys when the cursor does not immediately follow the prompt can
have
unexpected effects.
Billy Constantine
8 October 2004
|